
Are you aware that all of these features are available in Model-Driven Apps as column controls? A few years ago, we had to create custom email validation, auto-number, and rich text editors in our projects, but now they are readily available with a simple configuration. Maybe it’s time for a cleanup? #powerplatformcommunity #modeldrivenapps
How To: Microsoft Dataverse Security
Hello everyone! I hope everyone is having a great first day of the year!
I am very excited to announce that I have finally created a Youtube channel called “Coffee & Technology”. Yes, because these are two of my favorite things. 😀
This channel is dedicated to Dynamics 365 and the Power Platform community. I created this channel to share with you how you can leverage out of the box features of Dynamics 365 and share with you some tips and tricks I learned in the past few years.
In the first episode, I will show you how Dataverse Security can adapt to many business scenarios.
I hope you find this helpful and if it did, please don’t forget to like this video, share and subscribe.
Cheers to new hope, new chance! May we have a wonderful 2022!
PS: If you have any business scenarios you need help on and would like me to do a video of, please feel free to reach out. 🙂
Work Efficiently with XrmToolbox
I personally love learning and has always been passionate on sharing my knowledge especially if it’s about improving productivity.
In the past years, I have the ultimate go-to tool when it comes to tasks that require repetitive configuration. This type of job can be “easy,” but it can be very frustrating and very time-consuming.
This is XrmToolbox. It’s a FREE tool that uses Common Data Service for Apps as its foundational data service built to make administration, customization, or configuration tasks more manageable and less time-consuming. There are more than 100 tools available in the Tool Library, and here are some of the tools you can find:
User Security Manager – Use this tool to manage multiple users with multiple Business Units and Teams.

User Settings Utility – This comes in handy when you get a requirement to set default pane, tab, dashboard, etc. to multiple users or roles.

Workflow Buddy – Working with a vast Dynamics 365 project with several workflows can be very challenging when it’s time to troubleshoot. Although the Dynamics 365 Advanced Find can help, this tool makes it much easier to find a specific workflow.

Option Set Editor – Edit all your Option Set in one window. This editor is a life server when dealing with several local option sets in your environment.

Open Records using GUID – When it’s time to troubleshoot and look for a certain GUID, instead of exporting records and finding it manually, this would be the best tool available.

As I have mentioned, there are more than 100 useful tools available in XrmToolBox. Few of the popular ones are Ribbon Workbench, FetchXML Builder, Entity Relation Diagram Creator, Solution Transfer Tool and a lot more. Whether you are administering Dynamics 365 or managing solutions, troubleshooting or customizing it, this tool is something you must pin in your taskbar.
I hope you find this helpful. Enjoy!


Get Started with Dynamics 365 Field Service with Demo Data
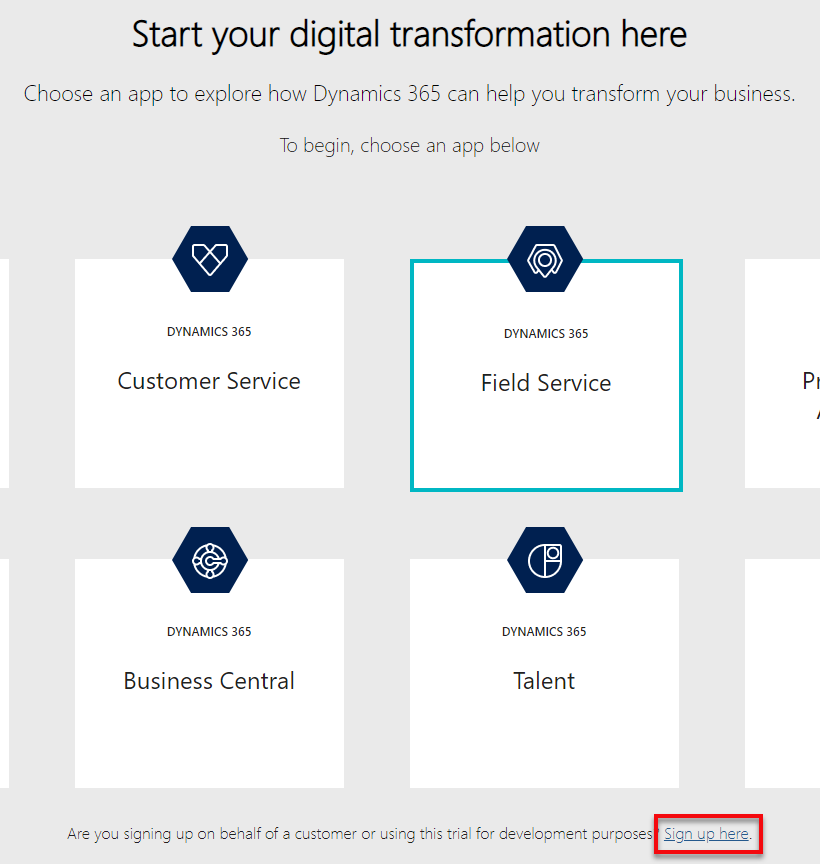
Looking to kick off Dynamics 365 Field Service trial environment with demo data? Well, you’re in the right place.
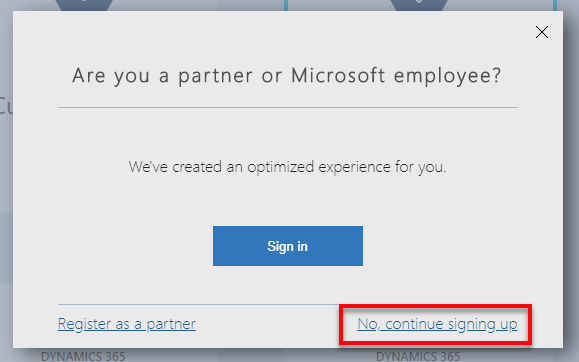
Make sure you have a valid email address and phone number. It does not have to be a work email. You can use an outlook account like what I did in this demo. Then, go to Dynamics Trial, select Field Service and click on Sign up here.
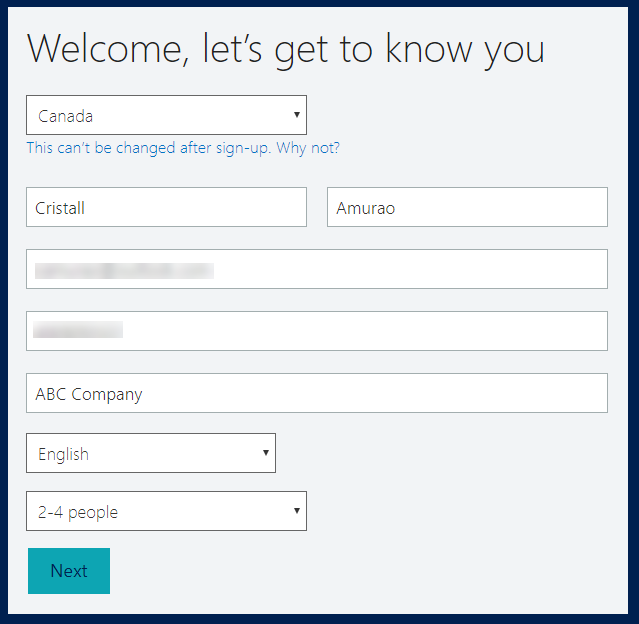

Once it’s up, you can start preparing the demo data installation.
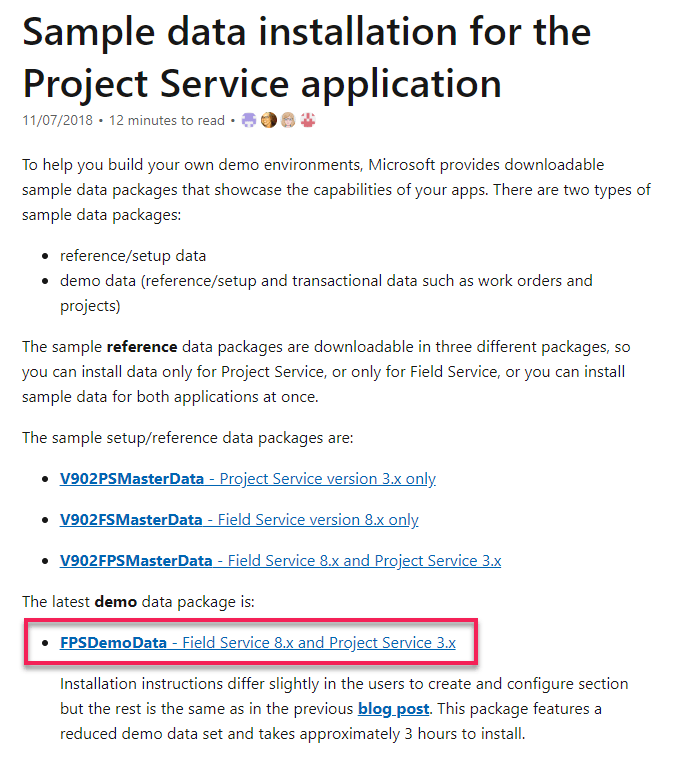
There are a bunch of things you need to pre-configure before you can install the Fabrikam Manufacturing Demo Data.
- Download the demo data and unpack. For US consumers, you basically just need to follow the steps on this link. For non-US consumers, you may have to encounter some other issues like date format, etc.
2. Create and configure users in Office 365. Make sure you assign Dynamics 365 license for each of them so their names will appear in Dynamics 365 Users list (Settings > Security > Users). Keep notes of the username you set for each of them as these are important for the configuration later on.
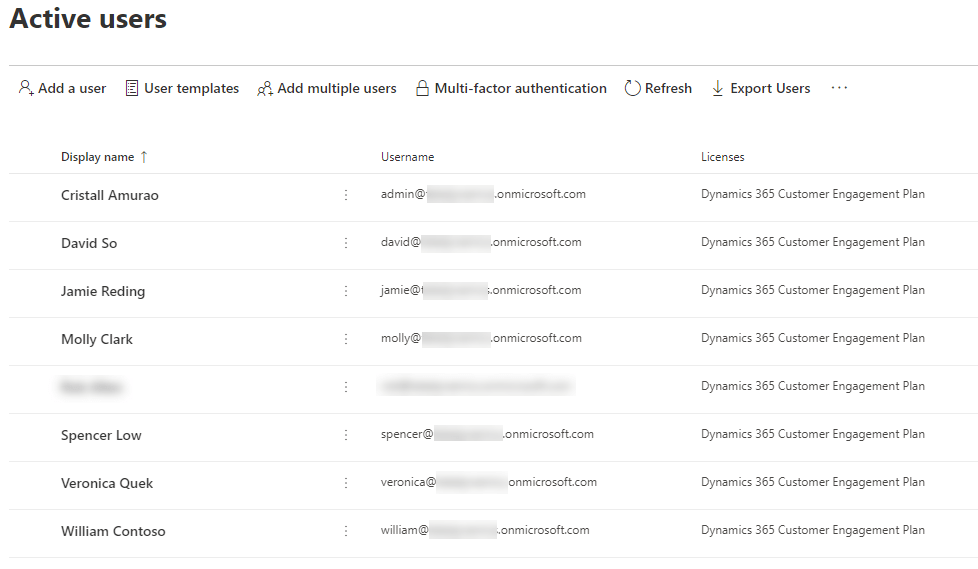
3. Once it appears in Dynamics 365 users list, set System Administrator role to each of them.
4. Go to the extracted Demo Data file (PackageDeployer_FPSDemoData_v3007) you just downloaded and open PkgFolder and then find and open ImportUserMapFile.xml. Now, paste the email address you created for each user in Office 365. Also, set the DefaultUserToMapTo= field to the email address of the Spencer Low user.

5. In the same folder (PkgFolder), find and open DemoDataPreImportConfig.xml and find the <userstocreateandconfigure> tag. Update the <login> tag with the username (case-sensitive) you set for each user from step 2.
6. Setup a work hour template for Spencer Low. Navigate to Settings > Security > Users, find/open “Spencer Low” user.
While in the user form, navigate on the top menu and select Work Hours.
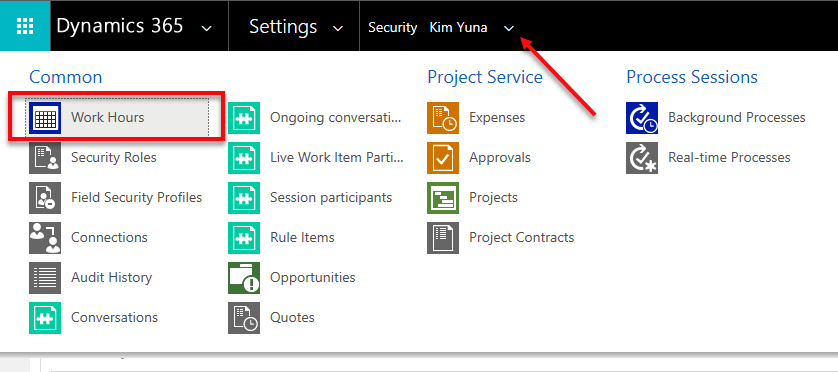
Click on the calendar and select More Actions > Edit. Select Entire recurring weekly schedule from start to end option and ensure the Work hours are set to 8 AM – 5 PM (9 Hours), Monday to Friday and with the Timezone set to Pacific Time (US & Canada). This is needed to ensure that the Project and Schedule board show as expected.
7. Before running the Package Deployer, check the following in Advanced Find to avoid encountering issues during the installation.
- Confirm that there is no more than one active Organizational Unit record, and then renaming it to Fabrikam US.
- Confirm that there is no more than one active Work Template record.
- Confirm that there is no more than one active Project Parameter record, and then renaming that entry to Parameters
Common Issues & Fixes:
- The pre-import process failed: Organisation should have no more than one active ‘msdyn_organisationalunit’ (fix: step 7)
- The pre-import process failed: ID for the user with login ‘davids’ not found (fix: step 5)
- Renaming Default Work Order Template failed with error: ID for User with login ‘davids’ not found (fix: step 6)
Now, you are ready to run PackageDeployer.exe.
Let me know how it goes in the comments down below.
Where to start?
Whether you are someone who wants to jump-start your career, or someone who wants to become certified, or an individual who just wants to grow their knowledge through in-depth learning and gain more confidence on Power Platform, Azure or Dynamics 365 on your own pace, here are the best place for you to go and learn.

Microsoft Learn – Microsoft has launched an improved learning portal a few years back and has published great content to help developers, architects, and IT administrators of all backgrounds to help them achieve more. I remember having to work on Azure or Dynamics CRM back in the day and cannot find any site to learn real-world examples to help me out. No worries because you will find a lot of helpful content now as Microsoft is committed to empowering everyone and has given us guided learning on all of their platform products and services that we can learn at our own pace. You can now explore their Learning Path to learn specific modules of your choice.
Udemy – This is my go-to place in learning more about Microsoft products from a different perspective. Tons of content creator shared a very detailed tutorial and excellent content to help you either pass your Microsoft certification or learn tips and tricks from their real-world experiences.
Enjoy learning and continue to inspire. If you know other learning sites and want to help out the community, please feel free to share it in the comments box below. 🙂
Why You Should Avoid Adding Full Tables to Your Dataverse Solutions
When working with Dataverse solutions, it’s easy to fall into the habit of adding entire tables “just to be safe.” However, this practice can introduce unintended side effects, some of which only surface later as dependency issues during deployments.
Why Adding Only Changed Components Matters
When Microsoft introduces updates to Dataverse, such as new columns or relationships, those components are automatically pulled into any solution that contains the full table objects. This can lead to unexpected dependencies, even if your team didn’t explicitly change anything.
A Common Dependency Pitfall
One common scenario occurs when Microsoft adds a new relationship between Case and Contact.
If your solution includes the full Contact table but does not include the Case table, Dataverse will still bring in the new relationship metadata. During import, this results in a dependency error because the solution now references Case, even though Case itself isn’t part of the solution.
These issues are often confusing, time-consuming to troubleshoot, and completely avoidable.
The Fix, and the Best Practice
To resolve the issue, remove the Account and Contact tables from your solution and re-add only the specific components that were changed and actually required. Do this every time you have to add new components in the solution.
This approach ensures:
- Cleaner and smaller solutions
- Fewer unintended dependencies
- Safer deployments across environments
- Less risk from future Microsoft platform updates
It’s important to note that this best practice applies to all tables, not just Account and Contact.
Key Takeaway
✅ Add only what you change
🚫 Avoid adding full table objects unless absolutely necessary
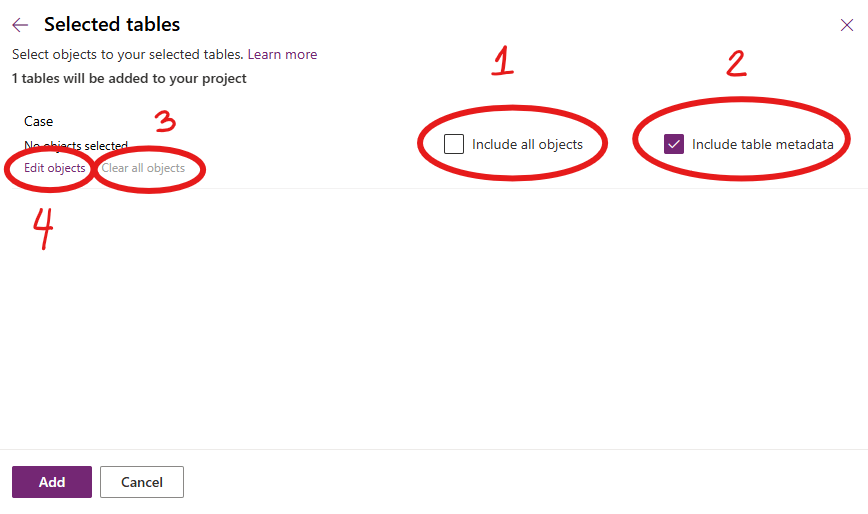
The How?
1. Ensure “include all objects” is unchecked
2. Ensure “include table metadata” is checked
3. Clear all objects (Important!)
4. Edit objects to select only the item you want to be included in the solution
Following this principle keeps our solutions stable, predictable, and easier to maintain, especially as Dataverse continues to evolve. Please don’t dig in or take shortcuts here; decisions like this have a ripple effect that impacts the entire team.
Power Apps Community Plan has been rebranded as the Power Apps Developer Plan
If you have not heard yet, you can actually have a free development environment to build and test with Power Apps, Power Automate, and Microsoft Dataverse.
In the Microsoft Learn article, it explains that this plan enables you to:
- Create apps and flows without writing code, with full-featured Power Apps and Power Automate development tools. Easily share and collaborate on these solutions with others.
- Connect to any data source by using 400+ out of the box connectors or by creating your own custom connectors.
- Use a fully managed, scalable data platform with Dataverse, including support for common business application actions. Use out-of-the-box common tables or build your own data schema.
- Export the solutions you create in your developer environment, and publish them on Microsoft AppSource so your customers can test-drive them.
For more information, please check out Microsoft Learn. Enjoy learning!
Improved Custom Recurring Tasks in Dataverse
Hi there! I have been receiving a few emails regarding my previous post about Custom Recurring Tasks. I read my post and realized that there are missing pieces in there. I probably left it like that to invite discussions and questions. Well, after more than a year, here we are and we got a few inquiries on the solution.
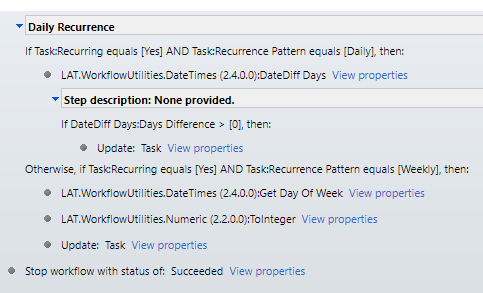
I tested the recurring feature of appointments and use that concept to re-create my Recurring Tasks solution.
I used the same UI section but I kind of optimized the Power Automate. Instead of 2 cloud flows, I kept it to one and use SWITCH to separate the daily vs weekly reoccurrence.
Here is how it looks now:

And to save you time, you can explore the solution by downloading it here. Have fun!
WHAT TO DO WHEN D365 DATA IMPORT DOES NOT WORK?
It gets frustrating when you are in a rush and D365 features does not work as expected for some reasons.
I usually try ALL the workaround first before opening a new ticket to Microsoft support. I want to make sure I have tried different ways and gather all useful information that I can share with Microsoft in case I needed to report an issue. This is also the best way to ensure that we can resolve an issue together as quickly as possible. Because, we are a team! Right?
Anyhow, I wanted to share something with you that I have used when Data Import get stuck in submitted status for some reasons. Usually, the first thing you look into is if the CRM environment is in Administration Mode. If YES, then turning it off should fixed the issue.
However, what do you do if its disabled but still getting this issue? (argh!) Open a Microsoft ticket! Right! But here is another thing that you can use.
Look into XRMToolbox. It usually have a lot of useful administration tool that can help and of course, Data Migration Tool. My goal is to import the same data I have in DEV to a UAT environment to ensure that I have the same GUID in all CRM environments. But why the same GUID, I’ll talk more of that some other time.
Data Migration Tool – I have been using this tool for years but did not realize that it has a filtering capability! I might be late on this but here is how you can use it.
When you create a schema and selected the entity you want to import, go to Tools > Configure Import Settings.

Then at the bottom, check User FetchXML to filter records.
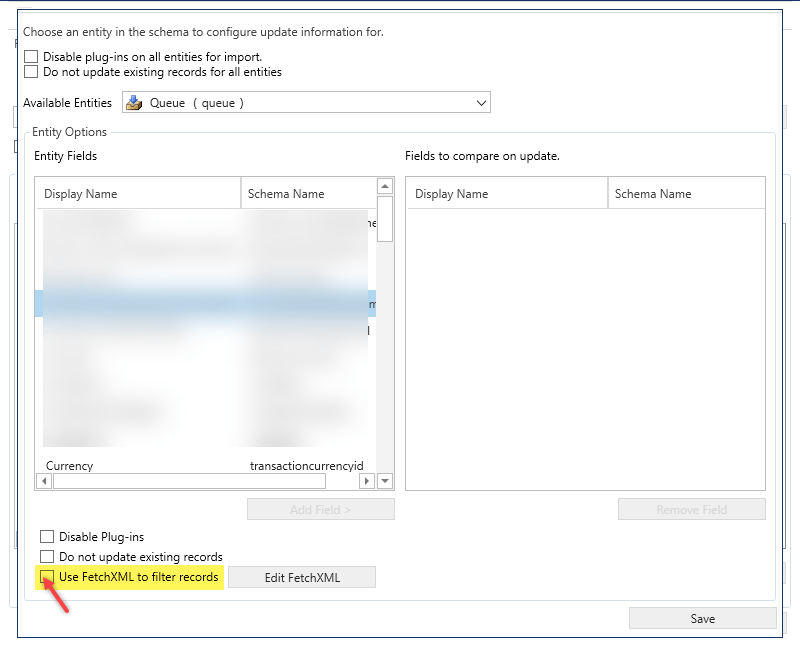
Now, you cannot use the whole fetchxml format, you need to remove the output-format and just keep the filtering tags, like this:

Save and you are good to go! I hope this helps and follow me for more tips! Stay safe, everyone!
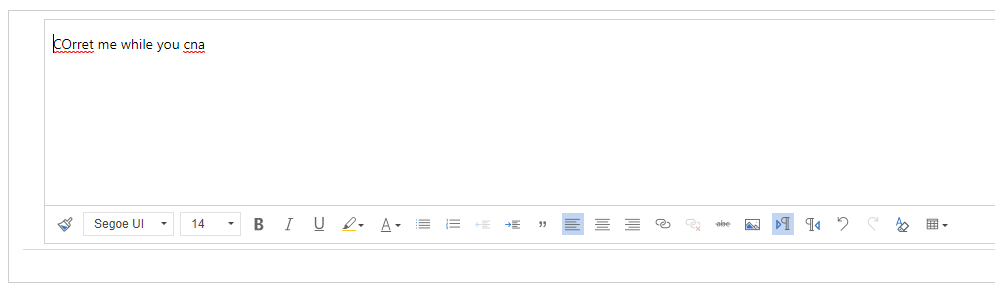
Rich Text Editor is live #2020wave2
Hey folks! How are you?
I just found out that the free 3rd party rich text editor that we have been using in Dynamics 365 for multiline of text removed its Spell Check feature but guess what???
Dynamics 365 has new Rich Text Editor PCF control and it looks awesome! Check it out!

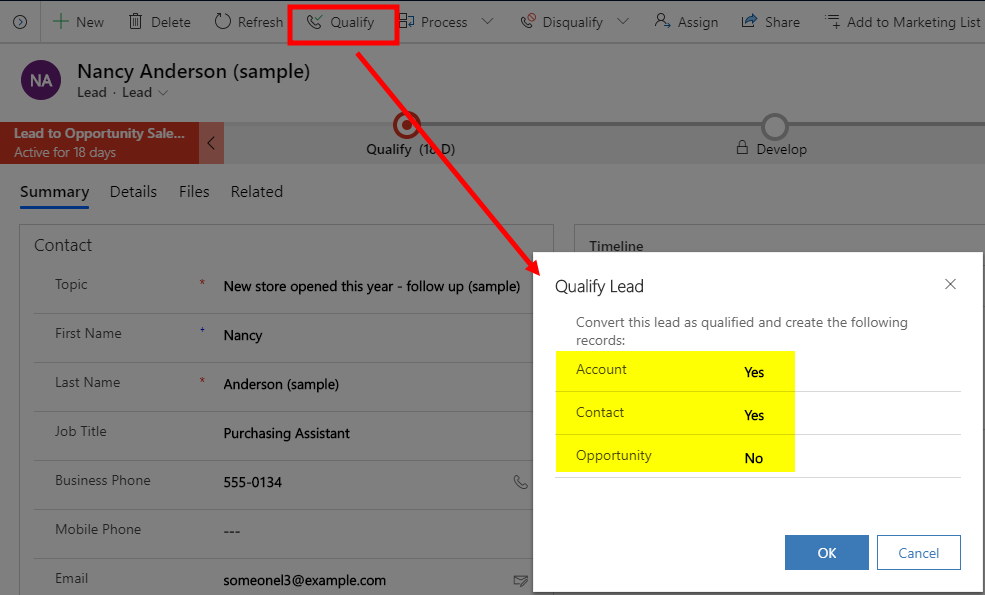
Qualifying a Lead WITHOUT creating an Opportunity #dynamics365sales #quicktip
Yes, it’s possible and all you need to do is to set it up in the system settings.
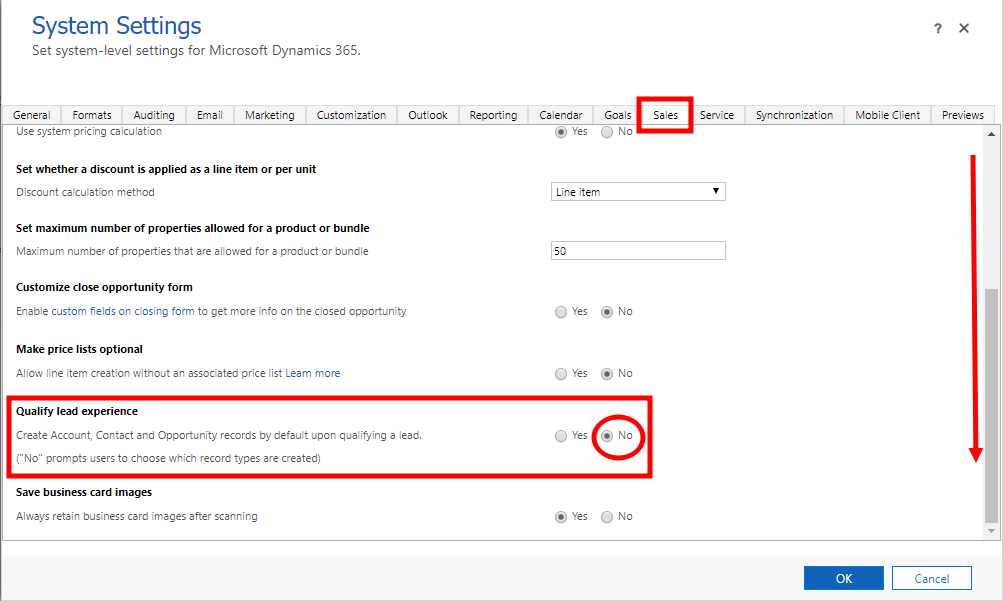
By doing this, you will be prompted if you want to create an opportunity when you qualify a Lead.
I hope this helps. Stay safe everyone.
Recurring Tasks in Dynamics 365 using Power Automate #lesscode
In Dynamics 365, Appointment Activity has recurrence feature. But what if business has a requirement to have the same functionality when using a Task Activity, like specifying a recurring pattern & dates?
Today I will share with you a simple approach on how you can create a custom recurrence feature in Task Activity using the power of Power Automate.
I used Custom Fields, a Workflow & 2 Power Automate Flows. I also used workflow extension from a Dynamics 365 Workflow Hero, Jason Lattimer.


I added a few more custom fields to hold daily & weekly count for doing a loop in Power Automate.

Then I created a Two Option field called “Automate” that I can use on my Trigger Condition.
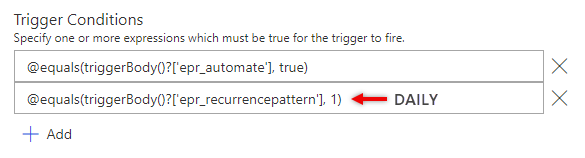

At the end, I make sure I decrement the Count just how we do it when writing codes. Then for weekly recurrence, I used Date Time connector – “Add a Time” and set it to add 1 Week.
And there you have it, a simple & working recurring task feature for your Task Activities.
I hope this is helpful. Let me know if you want to see the whole solution. Feel free to message me and I will send it straight to your mailbox.
Stay safe, everyone.
How to Create a Survey or Quiz Form for your Team? #office365 #microsoftforms
Did you know that there is an easy way to create a survey form or a quiz to send it to your employees or team inside or outside your organization?
Microsoft Forms can be shared in public as long as you don’t use the File Upload type. File Upload type is for internal members of your organization’s use only.

Responses are also available in real-time so you can review the results in no time just as how quickly you created it. Plus, it can be easily integrated with Dynamics 365 using Power Automate. 😉
I created this DEMO QUIZ in minutes showcasing the different types of control you can leverage from it. Feel free to try it and let me know how you feel about it.
If you have Office 365 license, you can try it by going to https://forms.office.com/.
Have fun!
