Why You Should Avoid Adding Full Tables to Your Dataverse Solutions

When working with Dataverse solutions, it’s easy to fall into the habit of adding entire tables “just to be safe.” However, this practice can introduce unintended side effects, some of which only surface later as dependency issues during deployments.

Why Adding Only Changed Components Matters

When Microsoft introduces updates to Dataverse, such as new columns or relationships, those components are automatically pulled into any solution that contains the full table objects. This can lead to unexpected dependencies, even if your team didn’t explicitly change anything.

A Common Dependency Pitfall

One common scenario occurs when Microsoft adds a new relationship between Case and Contact.

If your solution includes the full Contact table but does not include the Case table, Dataverse will still bring in the new relationship metadata. During import, this results in a dependency error because the solution now references Case, even though Case itself isn’t part of the solution.

These issues are often confusing, time-consuming to troubleshoot, and completely avoidable.

The Fix, and the Best Practice

To resolve the issue, remove the Account and Contact tables from your solution and re-add only the specific components that were changed and actually required. Do this every time you have to add new components in the solution.

This approach ensures:

  • Cleaner and smaller solutions
  • Fewer unintended dependencies
  • Safer deployments across environments
  • Less risk from future Microsoft platform updates

It’s important to note that this best practice applies to all tables, not just Account and Contact.

Key Takeaway

✅ Add only what you change
🚫 Avoid adding full table objects unless absolutely necessary
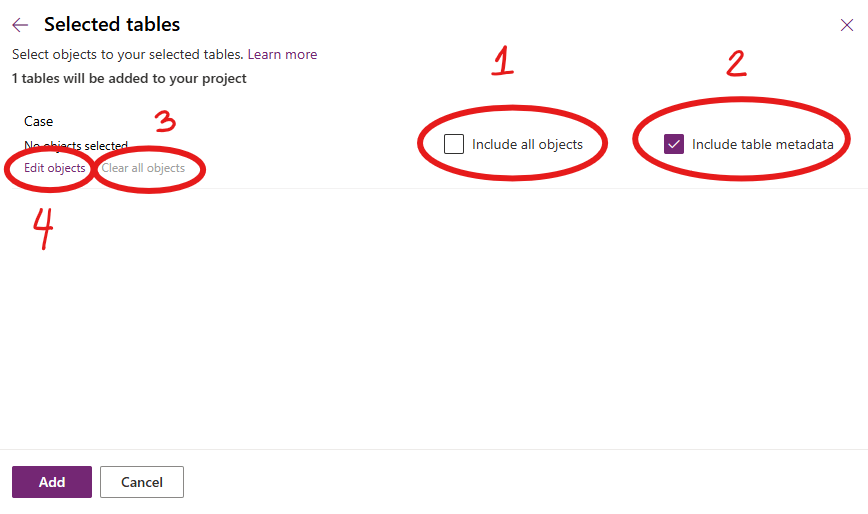
The How?

1. Ensure “include all objects” is unchecked
2. Ensure “include table metadata” is checked
3. Clear all objects (Important!)
4. Edit objects to select only the item you want to be included in the solution

Following this principle keeps our solutions stable, predictable, and easier to maintain, especially as Dataverse continues to evolve. Please don’t dig in or take shortcuts here; decisions like this have a ripple effect that impacts the entire team.

Leveraging the Power of Solution Checker from Power Apps

If you started your implementation with an older version of Dynamics CRM and had converted to the latest version or to using Unified Client Interface, and you want to ensure that your solutions are written based on best practices, Solution Checker will come in handy.

December 2018 when Microsoft started to feature it in public view. Based on the customers that used it, it helps them in resolving lots of issues and have seen 20% performance increases on their form loads.

How to get started? Go to the Power Apps portal and head on to Solutions. Select the solution you would like to check, and you will see the Solution Checker button.

For first time users, it will show you an option to install the solution. Installing it will direct you to the AppSource site. Click on Get it now, and it will redirect you to a page where you need to select the environment you would like to use it for. Click Agree and wait.

AppSource: PowerApps Checker
Note: Every new and existing CDS for Apps environment will now have the solution installed automatically

Before you are able to run it, make sure you have the proper Security Roles in your common data service environment. Two of the required permissions are Export Customizations and Solution Checker.

Required Security Roles to run Solution Checker

You know when it’s done when Power Apps sends you an email with the high level results.

What I really like about Solution Checker is the flexibility to review the results. You can easily view the results in multiple ways: online (make.powerapps.com), during export or in your local drive. Reviewing results online will give you the ability to filter results in different helpful ways.

Viewing Solution Checker results online

The cool thing about this checker is, it can detect missing functions that are set in your form properties’ onload, onsave and on change events. Example error: An event registration entry was detected on the form Contact for the entity Contact for the event onload where the function does not appear to exist in the referring web resource script, [name of the web resource file]. The function name defined is [name of function]. This will likely cause issues when trying to invoke the event.

Example of an actual medium severity result

I hope this helps you improve the quality of your solutions. Let me know in the comments below how this helps you or if you would like to share some tips for everyone to learn.

Create a website or blog at WordPress.com

Up ↑